Ok gentlemen/ladies today i have that tutorial i promised for you on how to make the end of the world that i showed a few days ago.
Step 1:
Make it fairly large 1280 x 1280 will do just fine (final comp will be a bit bigger).
Press D to reset FG/BG-color, then add a new Gradient Fill Layer – Name it “City Lights”. Pick a Radial gradient that goes from a white center to a black edge.

Step 2:
Now we will add some filters, it can be helpful to use the Filter Gallery to append these three filters…
Filter > Artistic > Plastic Wrap

Filter > Stylize > Glowing Edges

Filter > Texture > Stained Glass

Step 3:
Go to Image > Canvas Size and set it to 2048 x 1536px or whatever size you want your final composition size to be (note: the image will be scaled down later on).

Duplicate the City Lights Layer, then scale down the original (City Lights) to the size you want for the earth on your final piece.
Merge City Lights with Background. Name the Layers as shown below.

Step 5:
Working on the layer Flames. Select Filter > Blur > Radial Blur.

Select Filter > Distort > Wave.

Repeat the filter 2 or 3 times, each time click the Randomize-button (Ctrl + Alt + F). Set the blending mode of Flames to Screen, and lower the opacity to about 70%.

Step 7:
Duplicate Background and place it on the top of your layer stack, name it Smoke. Press D to reset your FG/BG-color, then select Filter > Render > Difference Clouds. Repeat the filter 5-6 times (or until you see a nice fire effect). Set the Blending Mode of Smoke to Color Dodge.

Step 8:
Add a new Color Balance Adjustment Layer, place it on the top of the layer stack.
Step 9:
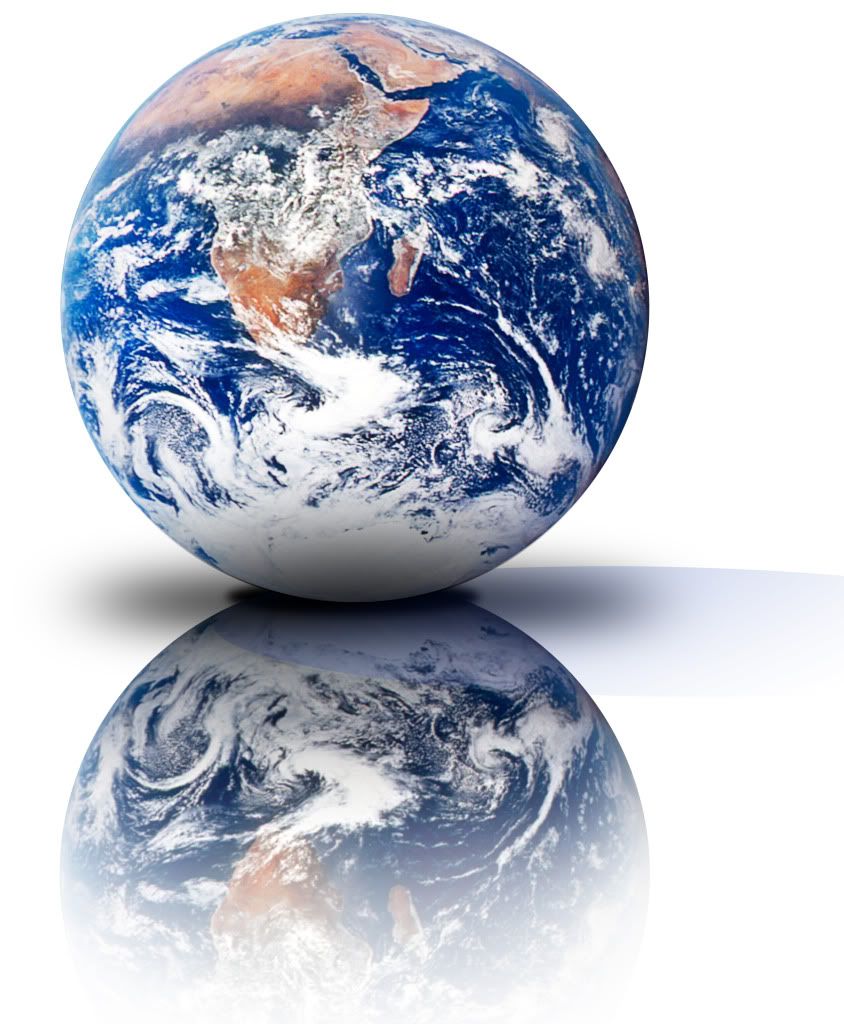
Open up the picture in Photoshop, select the earth using the Circular Marquee Tool copy it and paste it in our fire document (I suggest you select a bit inside the actual edge, to leave out any white). Click here for image (save it.)

Step 10:
Resize the earth so that it fits your “fireball” thingy ;) It does not matter if there are some white dots outside the earth. In fact, it might even look cooler!

Step 11:
Create a Layer Mask for Earth layer. Use a medium sized brush and start brushing the mask with Black/White to hide and reveal details.
Power tip: Use the smudge tool to mess up the edge of the mask, to make the fire look more natural

Step 12:
Add a Hue/Saturation Adjustment Layer, choose to use previous layer as Clipping Mask. Lower the Saturation and Lightness.

Step 13:
Create a new document 4000 x 3000 px, render some default colored clouds, copy and paste to our composition as a new layer Clouds.

Step 14:
Set the Blending Mode to Lighten for Clouds. Add a Layer Mask, fill it with black. Grab a soft large brush, set the opacity to about 5%, then paint in some clouds by drawing on the mask with a white color. Draw around the earth, then crank up the opacity and lower the size of the brush when you get more close to the edge.

Step 15:
Ctrl + Click on the Layer Icon for Earth. Create a new Fill Layer, any color. Set Fill (located below Opacity) of the Layer to 0%.
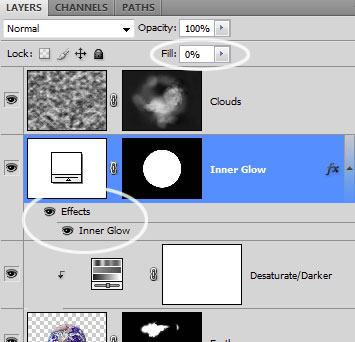
Double-click the layer and add an Inner Glow effect (dark red color).

Step 16:
Duplicate the Inner Glow layer you just created. Move the layer down so that it gets placed just above Background. Un-check the Outer Glow effect, then add an Outer Glow instead.
Duplicate the top Inner Glow again, this time make the inner glow a bright red color and decrease the effect. Set outer glow of this layer to a bright red color and decrease the effect.

Step 17:
For the star sky, create a new layer on top of all other layers. Fill it with black, then go to Filter > Noise > Add Noise.

Select Filter > Blur > Gaussian Blur, set it to about 0,4-0,8. Add a Levels Adjustment Layer, use Previous layer as Clipping Mask and drag the Midtones-slider to the right until you see a nice sky. Mask out the earth, then set the Blending Mode of the sky to Lighten.

Step 18:
Adding one final Color Balance Adjustment Layer on top of the whole layer stack will help you to tweak the colors of the final image. Add some blue for midtones and shadows, then crank up the yellow and red for highlights. Also on the Earthlayer you can set the Lightness and Saturation to almost 0 and control the effect with a radial gradient + brush mask instead. If you want the lava less textured, you can duplicate the Background and blur it, then mask parts of the fire that you want to blur.
When you are happy with the result, save a copy of the image then go to Image > Resize.

Setting re-sampling algorithm to Bicubic Sharper will keep the stars and the lava crisp.

Step 19:
Select the Background layer and go to Filter > Render > Lens Flare. You may have to play around with the position to get the flare right.

Step 20:
Create a new layer on top of all other layers. Then repeat the Lens Flare filter (Ctrl + F). Lower the Opacity of the layer a bit and set the Blending Mode to Screen. You might want to mask out some of the details on this one.

There you go everyone. Here is that Tutorial... Might do a few others... Good luck
wow impressive, gonna try your tutorial tomorrow and will make my own world explode
ReplyDeleteWow this is quite awesome. I haven't done a Photoshop tutorial in about 4 years, but this has inspired me to pick it back up.
ReplyDeleteits so beautiful, but you the blue from the ocean looks out of place somehow?
ReplyDeleteI had to read this twice today to get the full gist, but I think I got it. Thanks man!
ReplyDeleteThat's awesome. I've always wondered how you photoshop whizzes do some of that crazy stuff.
ReplyDeletenice work...im gonna check you out again
ReplyDeletei will try the tutorial now
ReplyDeleteThat is absolutely stunning, so skillful. I'm setting up to do it now lol
ReplyDeletethose are really nice photoshop skills!
ReplyDeleteI still can't get it to look right...trying again from square one and I will tell you how it goes.
ReplyDeleteGreat tutorial man, very detailed, i was able to achieve a simliar effect.
ReplyDeleteAaron Why don't you load what you did get to photobucket and show us? Remember it won't always turn out the same as what others show
ReplyDeletewow that was sick. Nice detailed, well written tutorial.
ReplyDeletefuck awesome
ReplyDeletenice tutorial, if i ever wanna make my own wallpaper ..
ReplyDeleteI never thought I'd enjoy seeing someone end the world so much! awesome blog dude!
ReplyDeleteLooks great. Now you just have to add some UFOs and it's perfect :D
ReplyDelete